Gathering user input with Shopify
Shopify includes everything you need to setup an online store, including free web-based store building software, unlimited ecommerce website hosting, and more. It is a great tool for both users and developers. It offers a great API which has libraries for many languages (PHP, Python, Ruby, …) and a great back-end for customization of a store; templates, snippets, assets and more.
A few times now, I’ve had to develop private Shopify Apps where the client would request the ability to gather custom user-inputted data from a product page, which they could see on their order form to full-fill. As recently, I developed a Shopify modification which needed to do just this, allowing the client to gather dimension data (width, length and height) from the customer.
Shopify currently has no option for letting users add custom fields to the product page besides variants which does not offer text input and is really not suited for this type of application.
The solution - it’s simple, Shopify has product properties which you can simply modify the the product’s liquid template and add in your custom product fields; it will automatically show up on the order form when submitted in your Shopify back-end.
Let’s take this example; like I said above, I recently did this for a client where he could capture custom dimensions from a customer. All below actions will affect all products in your store. If you wish to affect only certain ones you will have to modify the liquid code more or use the API. But for example’s sake let’s do it for all products.
First, we open product.liquid of your current shop’s theme, from here find the add cart form which looks similar to the form code below.
<form id="add-item-form" action="/cart/add" method="post">Next, we add our property HTML. Shopify looks for input fields which contain the name “properties”. Anything inside the braces will be the label of what you want to capture; you can change Dimensions to something like Size, Hex Color, etc.
Dimensions (W x L)<input type="text" id="dimensions" name="properties[Dimensions]">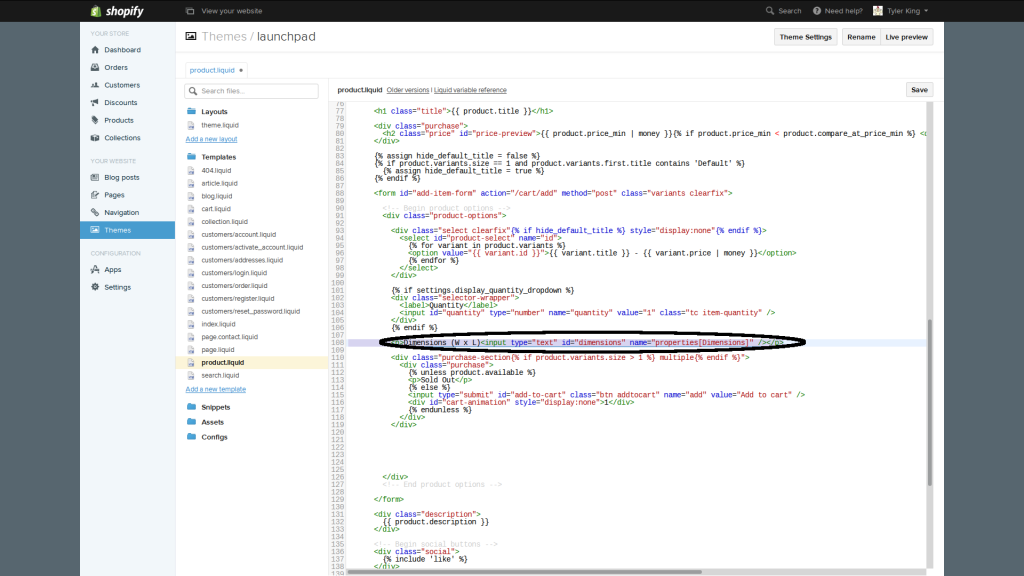
In the image above (click to enlarge) I’ve added the code just below the variant definitions for the product. This is a very basic example with no styling, so you may style it how you please later. As you can see, I’ve set a name for the customer to see “Dimensions (W x L)” and the input which Shopify can see using the __properties __HTML array. The cool thing about it is, you can add more than one - even add file uploads!
Next, save the liquid template and view a product you have in your store. You should see the dimensions field we just added and it should be usable.

Now that our dimensions input shows up. Let’s go ahead and have it show up on the cart page (for when they add it to their cart). Open cart.liquid in your current shop’s theme, find a line which contains the product’s title for example “{{ item.product.title }}”. Below this, we will add the liquid code which will list all of the properties that the user has entered, because remember, you can add more than one.
{% raw %}
{% for p in item.properties %}
  {{ p.first }}: {{ p.last }}
{% endfor %}
{% endraw %}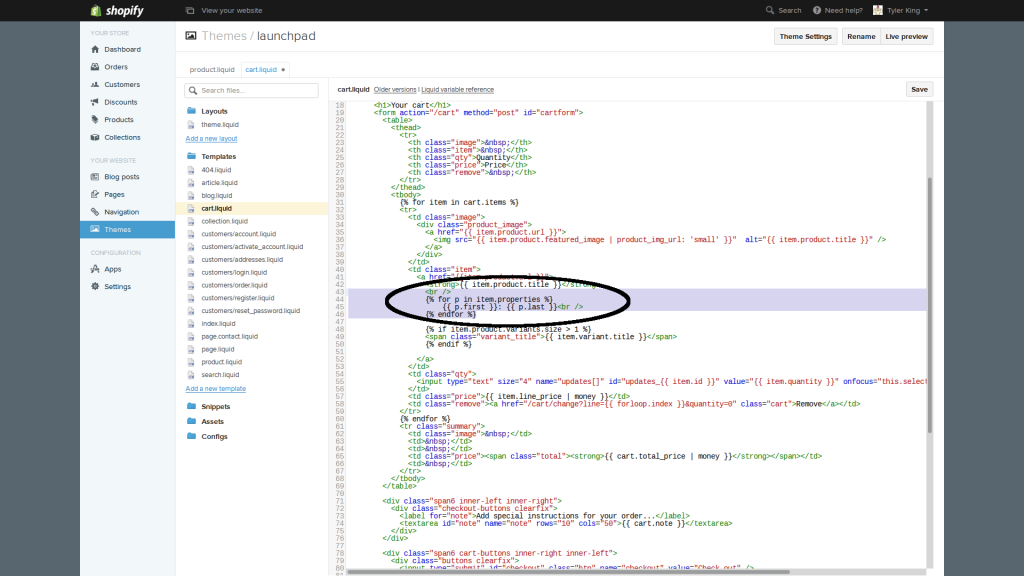
This will allow the customer to see what they have entered or uploaded as well when they visit their cart page. So go ahead and save the template, go back to a product, enter some data into the dimensions field we added then add it to your cart. Once added, view your cart and you should now see what you entered on the previous page.

As you can see, on your cart page you can now see what you have entered. Again, this is just an example and is completely customizable by you in any way. Now go ahead and submit the order, we will view what you will see in your Shopify admin dashboard for the order.
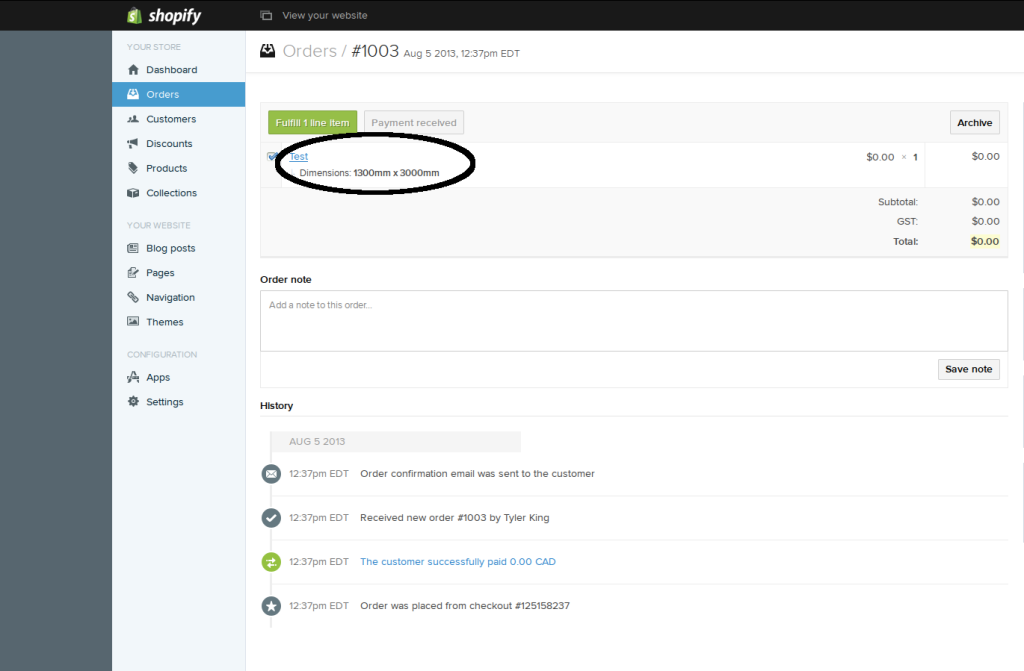
It’s captured and it’s that easy. Now you have an easy way to gather the customer’s input on products of your shop. This is only a bare example, you can of course, style it, customize the HTML, add javascript and validation, and even tack on the captured data to the customer’s email order confirmation.
I hope this tutorial will help others, it seems to be a frequently asked question among Shopify users and developers. For more information see Shopify’s wiki entry for the subject here.